

Automated focus stacking in microscopy with Helicon Remote
A useful cross-platform software tool to enhance image quality and depth of field
Helicon Remote is a tethering software utility designed for both Wi-Fi- and USB-connected photography, enabling remote camera control (mainly for Canon and Nikon models). The camera is placed on a motorised microscope stand and is controlled via the software from a PC, Mac, Android or iOS device. The Helicon software suite also offers convenient time-lapse capabilities, alongside focus stacking and exposure bracketing. Additionally, its Live View display features options for image rotation, horizontal and vertical mirroring and displaying grid lines and rulers in the live image.
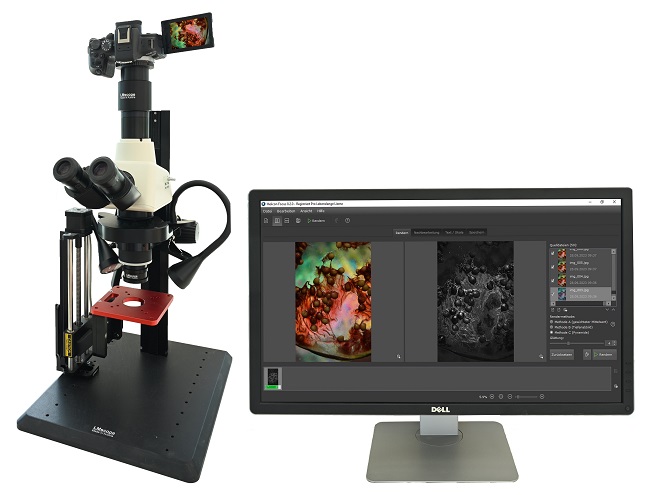
Focus stacking is a photography technique where multiple images, each taken at different focus points, are combined to create one perfect composite image with an extended depth of field. The Helicon software suite consists of two modules: The Helicon Remote module controls the camera and the focusing rail (z-axis). After the stack has been created, it can then be processed with the Helicon Focus module. The two modules are interlinked, allowing the user to switch between them with a single click, which creates an efficient, user-friendly workflow.
The automated capture of a series of microscope images taken at different focus distances significantly enhances the overall image quality in terms of depth of field and resolution. To get a perfect single image, professionals often compile and process a hundred or more individual frames.
Helicon Remote: a brief description
Helicon Remote runs on different operating systems (PC, Mac, Android or iOS) and is designed for controlling and displaying the Live View feed of modern mirrorless system cameras and DSLRs. It supports an extensive array of camera models – a detailed compatibility list is available on the Helicon website.
This report will focus specifically on the PC and Mac platforms, as the full suite of Remote and Focus can be run on them and they are most commonly used in professional settings.
Both the camera and the motorised staged are connected to the computer with a USB cable.
Wired communication via USB facilitates minimal delay and maximum image quality when viewing the camera’s live image. A wired connection via Wi-Fi is possible, but comes at the cost of lower data transfer speeds, image quality and data security.
For routine operation, we recommend using a USB cable for the connection to the computer.
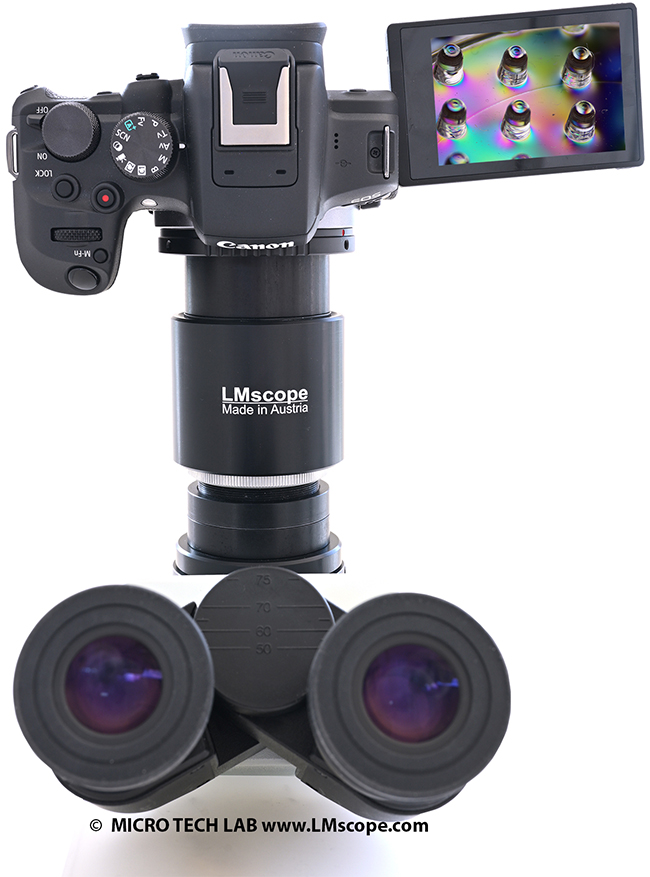
Once the camera is attached to the microscope or macroscope, the Helicon software has been installed successfully and the USB connection to the computer has been established, a large live image is displayed on the computer screen.
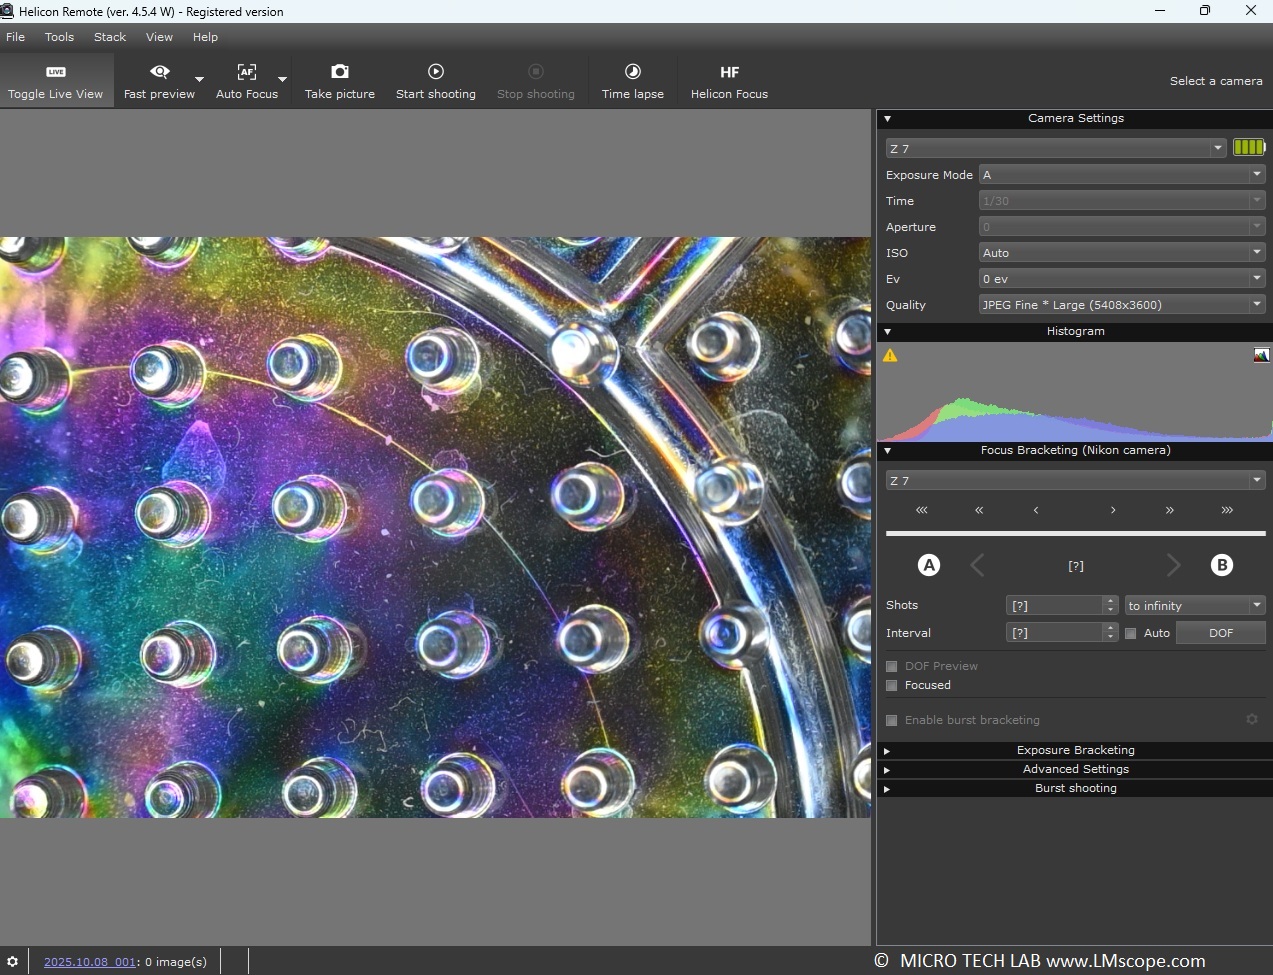
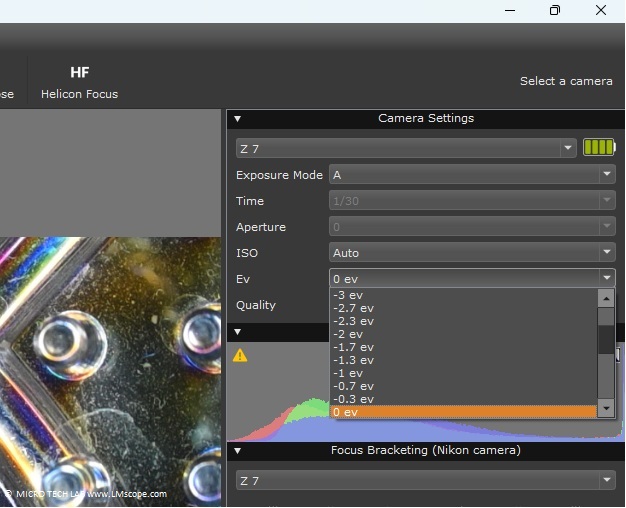
The right side of the screen shows the camera status and the main camera settings: exposure control, ISO settings, brightness and image quality, including resolution and file format (JPG or RAW). Below, a histogram shows the brightness distribution for the three primary colours (RGB).
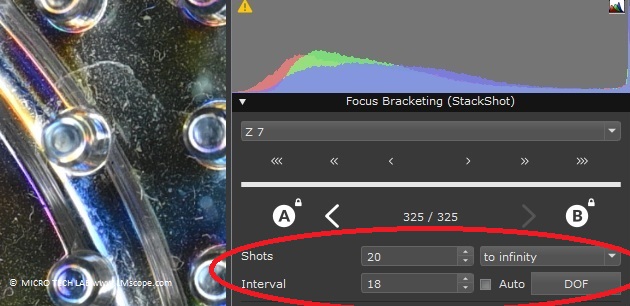
Further down, there is a window for adjusting the focus points along the z-axis of the motorised stage.
Once the camera connection has been established, the next step is to configure, integrate and start up the motorised stage. The Helicon software is able to communicate directly with popular focus rails, such as those from StackShot, Trinamic or Wemacro, which typically feature a stepper motor. Important settings can be accessed in the menu.
The time interval [s] between two shots is an important input parameter, as it has a direct impact on image quality: every movement of the stepper motor along the z-axis causes minimal vibrations of the entire photographic unit. To avoid motion blur, a brief pause of a few seconds after each movement is advisable.
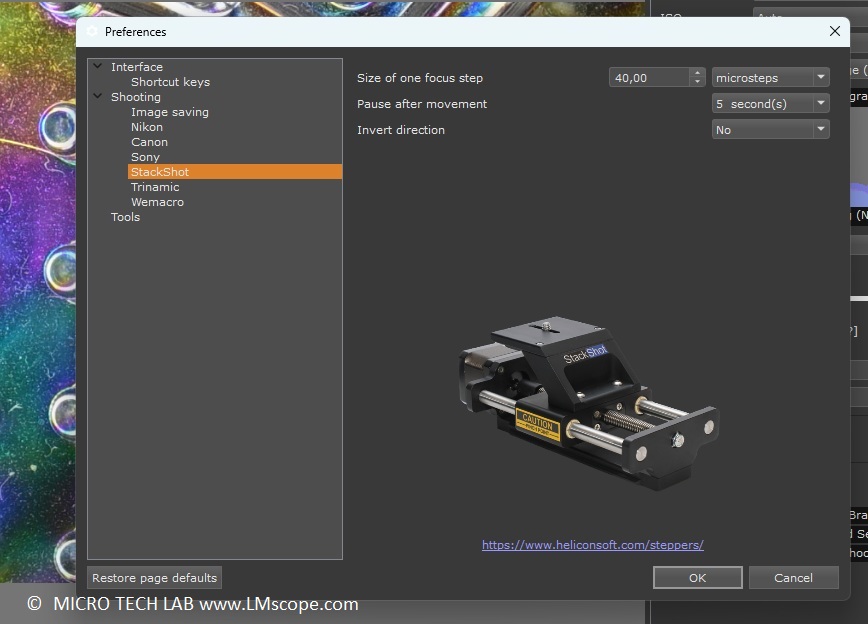
In our example application, we used the highly popular and efficient StackShot focusing rail.
Clicking the arrow buttons on the computer display moves the unit up or down.
<<< or >>> Large step size
<< or >> Medium step size
< or > Small step size
The [A] button sets the upper and the [B] button the lower focus point. The number of images in the focus range can be set in the [Shots] menu item. Typically, a number between 20 and 100 is selected.
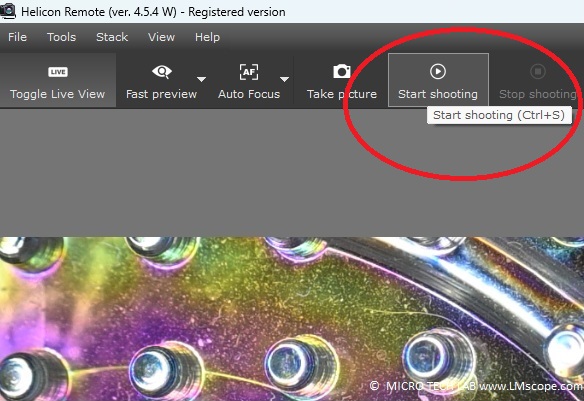
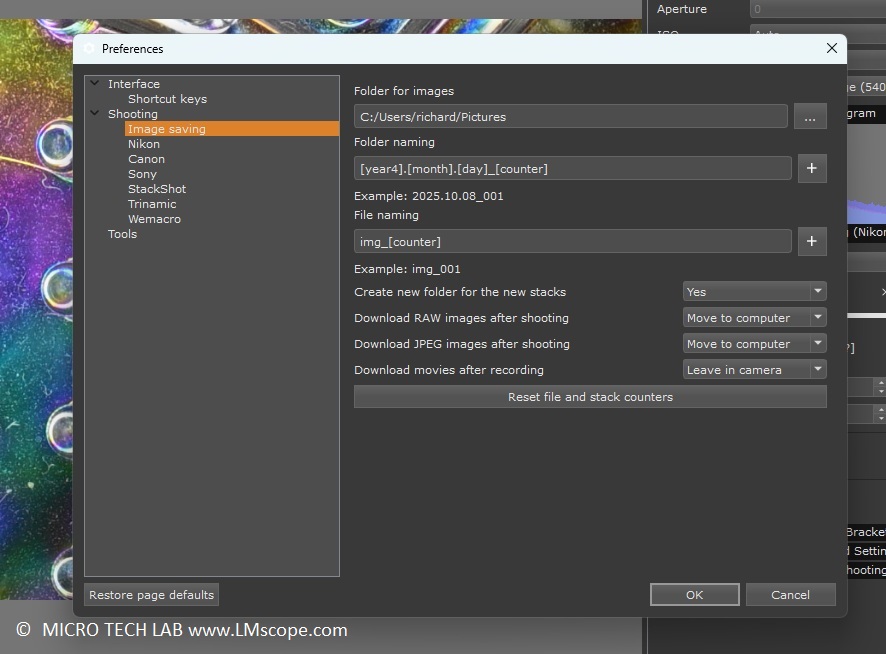
Once the key parameters have been configured, the focus stacking sequence can be started by clicking [Start Shooting]. The individual shots are then automatically saved to a designated folder on either the PC or Mac and can be further processed in Helicon Focus with a single click.
The screenshots below outline the key settings of the software:
Brightness:
Basic settings:
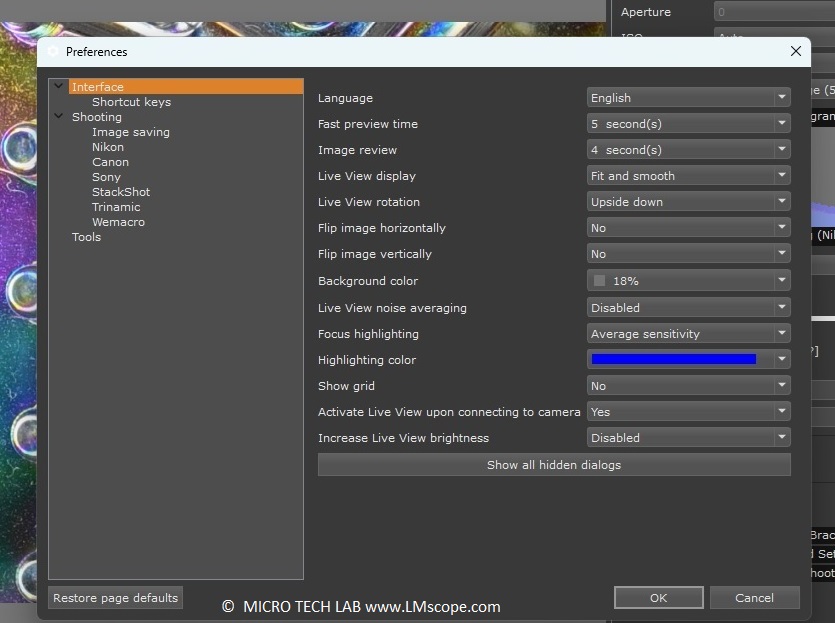
Additional settings can be configured in the “Image Saving” section, for example the folder where the images will be saved after shooting and the type of file storage.
For more information about the Helicon software suite, please visit the manufacturer’s website. A demo version is also available, which can be downloaded directly from the website.
18.12.2025New LM Digital Adapter for: Sony Alpha 9 III / Sony Alpha 7R VI / Nikon Z9 / Nikon Z8 / Sony Alpha 7R V / Sony Alpha 1 II / Sony Alpha 1 / Sony Alpha 9 II (ILCE-9M2) / Sony FX3 Cinema Line / Sony Alpha 9 / Nikon D6 / Canon EOS R3 / Sony FX3 / Canon EOS R6 Mark II / Canon EOS R8 / Sony Alpha 7R IV / Canon EOS R5 II / Nikon Z6III / Canon EOS R5 / Sony Alpha 7S II / Sony Alpha 7S III / Sony Alpha 7R III / Canon EOS R6 / Nikon Z6 / Nikon Z6II / Sony Alpha 7R II / Nikon Z7 / Nikon Z7II / Canon EOS R / Canon EOS Ra (Astro) / Nikon Z5 / Sony Alpha 7C / Canon EOS RP / Sony Alpha 7S / Canon EOS R7 / Leica SL2-S / Canon EOS R10 / Nikon Z50 II / Canon EOS 1D X Mark III / Nikon Z50 / Nikon Z30 / Nikon Z fc / Nikon D850 / Canon EOS 1D X Mark II / Nikon D780 / Olympus OM-1 / Sony Alpha 7III / Olympus OM-D E-M1 Mark III / Canon EOS R100 / Sony Alpha 6700 / Nikon D5 / Sony Alpha 6600 / Fujifilm X-H2S / Fujifilm X-S10 / Fujifilm X-E4 / Fujifilm X-Pro3 / Olympus OM-D E-M1X / Sony Alpha 6400 / Sony Alpha 6100 / Sony ZV-E10 / Canon EOS 1D X / Nikon D4s / Olympus OM-D E-M5 III / Canon EOS 90D / Canon EOS 5D Mark IV / Nikon D4 / Nikon D750 / Canon EOS 6D Mark II / Fujifilm X-T5 / Fujifilm X-T4 / Fujifilm X-T3 / Sony Alpha 6300 / Sony Alpha 6500 / Nikon D500 / Nikon D810 / Nikon D800 / Canon EOS M6 Mark II / Nikon D800E / Nikon Df / Panasonic Lumix DC-G9 / Nikon D610 / Nikon D600 / Canon EOS 250D / Canon EOS 850D / Rebel T8i / Canon EOS 6D / Sony Alpha 99 II (SLT-A99 II) / Canon EOS M200 / Canon EOS 5DS R ( without low-pass filter) / Olympus OM-D E-M1 Mark II / Canon EOS 80D / Canon EOS M50 Mark II / Canon EOS 5DS / Canon EOS M50 / Sony Alpha 77 II / Canon EOS 70D / Nikon D7200 / Pentax K-1 Mark II / Canon EOS 200D / Canon EOS 800D / Rebel T7i / Canon EOS 77D / Canon EOS 5D Mark III /