

A Step-by-Step Guide to Better Microscope Photos:
Workshop on Improving the Quality of Your Microscope Images
-
Focusing the image
-
Selecting a digital camera that is suited for microscopy use
-
Avoiding vibrations on shutter release
-
Using the anti-shock function (mirror lock-up) in DSLR cameras
-
High-quality “infinity corrected” microscopes are recommended
-
Using high-quality microscope lenses
-
Optimum exposure time increases focus
-
Macroscopy: It all comes down to lighting – good lighting makes spatial structures visible
-
Lighting in microscopy
-
Optimal lighting: LED lighting revolutionises microscopy
-
Stabilised power supplies for lighting are mandatory
-
Macroscopy: Precise adjustment of the camera unit using a spirit level
-
Increasing contrast with pigment
-
Deactivation of the shutter release lock when using a camera with interchangeable lens mount on the microscope
-
Using a daylight filter and white balance
-
Setting parfocality
1. Focusing the image:
Cameras with Live View:
Step one is to focus the image using the coarse and fine focus adjustment while looking down through the eyepiece of the microscope. Further fine tuning is possible with the camera’s built-in LCD monitor (or an external control monitor). Now, turn the fine focus adjustment knob of the microscope until the image is displayed as sharply focussed as possible. The magnifying function of the camera is of great importance.
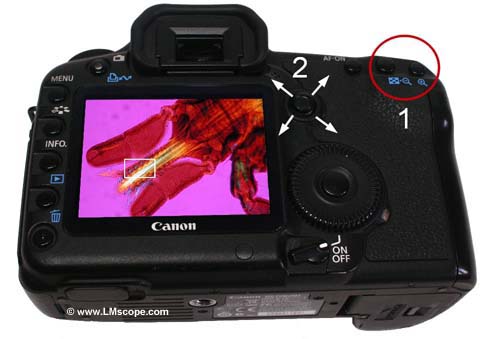
With one press of a button, a detail of the image can be displayed in enlarged form. Depending on the camera model, details can be magnified to up to 15 times the original size!

This function makes it possible to display small details on the camera screen. If the magnifying function is not used, small amounts of blurriness might remain undetected, because the screen, with its resolution of about 1 megapixel, has far fewer picture elements than the sensor chip, which can process images up to 25 megapixels. For this reason, it is quite difficult to set the exact level of focus without the magnifying function. We also recommend using the magnifying function when you are working with an external HD monitor via the HDMI port. Full HD standard (1920 x 1080 pixels) is also only a little more than 2 Mb.
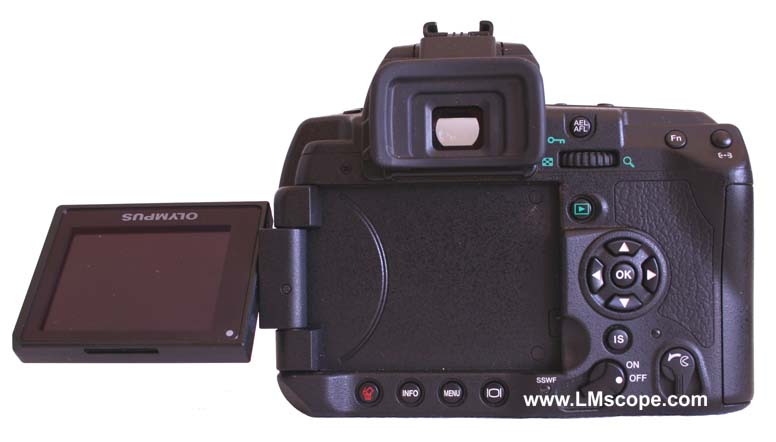
Cameras without Live View:
First, focus the image using the coarse and fine focus adjustment while looking down through the eyepiece of the microscope. The best way to precisely adjust the focus is with the optical viewfinder and the fine focus adjustment knob of the microscope. An angle finder with optical magnification or an electronic viewfinder (e.g. Zigview) will make focusing much easier. However, this equipment is relatively expensive.
2. Selecting a digital camera that is suitable for microscopy use
Not all digital cameras work equally well with a microscope. Better results can often be achieved with inexpensive or older models than with the most recent top-of-the-line cameras. On our website, we have compiled a list of camera recommendations to help you choose the camera that is best suited for your needs. You will also find an overview of camera features that are especially important for microscopy. We update this camera ranking at regular intervals and are able to maintain our objectivity since we have no cameras in our own product range.
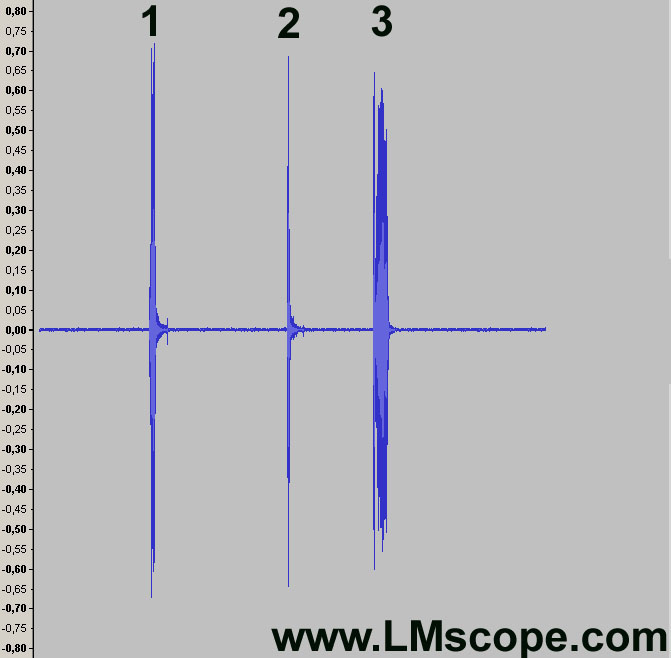
3. Avoiding vibrations on shutter release
During manual operation of the shutter release button it often happens that the images taken are shaky and blurry, as every movement is accentuated. We recommend the following solutions, which are easy to implement:
-
Remote control release (with or without cable)
-
Delayed shutter release using the self-timer function
-
Shutter release via a computer
4. Using the anti-shock function (mirror lock-up) in DSLR cameras

When using DSLR cameras, undesired vibrations may occur when the mirror is folded up upon shutter release, which can considerably impair the quality of the images taken. However, many DSLR cameras have a dedicated mirror lock-up feature in the menu. If this feature is activated, the camera’s mirror is folded up immediately but the shutter itself is released only after a short pause. This option in the menu is named differently by the various camera manufacturers:
- Canon: mirror lock-up
- Olympus: anti-shock
Cameras with an interchangeable lens mount system and no mirror, or with a fixed semi-transparent mirror, produce hardly any vibrations.
5. High-qualitiy "infinity corrected" microscopes are recommended
Photography with old “finite” microscopes
In order to achieve maximum flexibility, LM microscope adapters do not perform any compensatory functions. When mounting a new LM microscope adapter onto older brand-named microscopes (< 1985) or onto new microscopes with a “finite” optical system, some blurring might occur around the edges of the image, because with this microscope design the lenses are not fully corrected. Only the eyepiece corrects residual errors of the lens. Various microscope manufacturers and even some microscope series with a “finite” optical system offer special compensating eyepieces. With these eyepieces, each microscope is able to individually correct the image following the lock-and-key principle.
In this scenario, the microscope adapter would have to correct the individual errors of each instrument with a “finite” optical system in order to maintain a high image quality of the photographic documentation. Unfortunately, this is not possible, since there are hundreds of different microscopes on the market. Upon request, we will gladly provide information about individual, customised solutions. For high-quality images we therefore recommend using infinity corrected microscopes.
Modern high-grade microscopes with infinity correction have a fully corrected optical system preceding the eyepiece, and image errors are corrected by a tube lens in the microscope, so that the eyepiece no longer has to perform corrections. These microscopes are optimally suited for delivering high-quality photographic and video material.
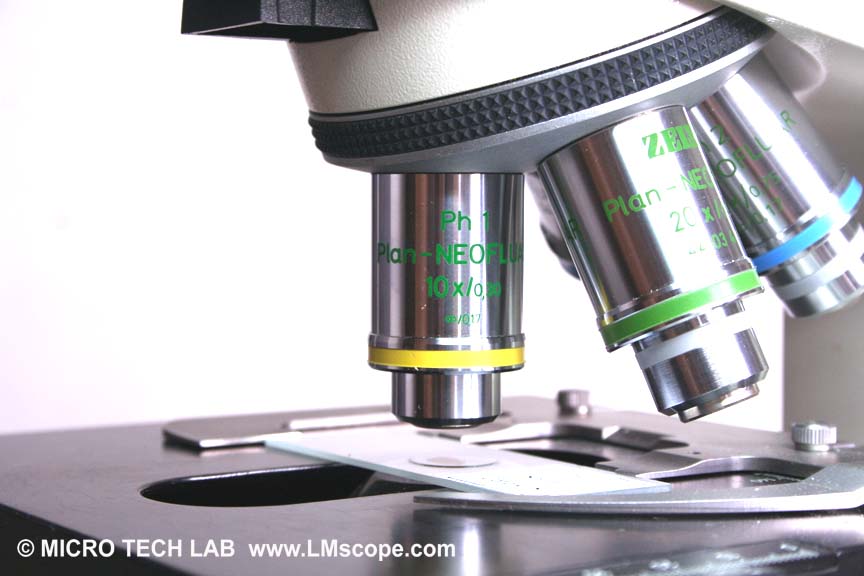
6.Using high-quality lenses is highly important in photomicrography
On visual examination through the eyepiece, image flaws are often not noticeable. In photographs, however, such errors are much more obvious, thereby impairing the image quality. Typical image flaws are colour fringing and peripheral blurring. This discrepancy in perception is a result of the accommodative abilities of the human eye. The eye is able to eliminate image errors, whereas the camera – unfortunately – cannot.
In order to correct image flaws as comprehensively as possible, a very complex and expensive lens design is required. Where possible, all colours of visible light should be corrected, so there can be no longitudinal chromatic aberrations.
With apochromatic lenses, all colours are projected precisely onto the focal point.
The description “plan” indicates that the lens delivers a planar intermediate image, where field curvatures are flattened out. If there is no such correction, the image will become increasingly blurred towards the edges.
The description “fluorite” indicates the use of special fluorite lenses. Using a lens design that is quite simple in comparison with apochromatic lenses, longitudinal chromatic aberrations can be corrected. This lens type, with its simple design and a lower number of lenses, delivers relatively high luminous intensity and contrast levels, which is particularly advantageous in the case of contrast methods (fluorescence, etc.).
|
|
Advantage |
Disadvantage |
|
 |
Achromatic lenses |
lower cost simple design long operation distance suitable for almost all microscopic methods |
correction only for yellow and green field curvature still present |
|
Plan achromatic lenses |
simple design field curvature corrected long operation distance suitable for almost all microscopic methods |
prize correction only for yellow and green |
|
"Semi-plan achromatic" lenses "Micro-plan achromatic" lenses achromatic lenses with improved field uniformity |
lower cost simple design field curvature in the centre of the image corrected long operation distance suitable for almost all microscopic methods |
prize correction only for yellow and green field curvature still present at the edge of the image |
|
Fluorite lenses |
simple design very good chromatic correction high luminous intensity and contrast suitable for all microscopic methods |
prize field curvature still present short operating distance
|
|
Plan fourite lenses |
relatively simple design very good chromatic correction little field curvature high resolution high luminous intensity and contrast suitable for all microscopic methods |
prize short operating distance
|
|
Apochromatic lenses |
best chromatic correction highest numerical aperture
|
prize field curvature still present somewhat lower in light intensity and contrast than flourite lenses short operating distance |
|
Plan apochromatic lenses |
best chromatic correction highest resolution no field curvature |
prize somewhat lower in light intensity and contrast than flourite lenses not suitable for all microscopic imaging methods because of complex optical designshort operating distance |
7.Optimum exposure time increases focus
Vibrations can be reduced by shortening exposure times. Even minimal vibrations of the microscope or camera worsen the image quality considerably. However, not every microscopic method permits short exposure times or supports the resulting increase in light intensity. Living cells, for example, react very sensitively to the luminous energy of the lamps. In low-light imaging techniques, by contrast, such as fluorescence, polarisation or phase contrast microscopy, only a little light enters the camera, placing greater demands on the sensitivity of the imaging system. This makes longer exposure times necessary.
Modern digital cameras are equipped with intelligent automatic exposure functions. In automatic exposure mode, the camera independently selects the right exposure time and chooses the shortest possible duration. With the “plus” and “minus” buttons (exposure settings), it is possible to alter the exposure. The image will then appear lighter or darker as required.
When used on a microscope, not all cameras support automatic exposure by default. On these models, the exposure time must be set manually.
8. Macroscopy: Good lighting makes spatial structures visible
By choosing optimal lighting, structures appear clearly and in detail on the specimen slide. The interplay of lighter and darker areas reveals spatial structures. An experienced photographer knows how to optimally light the object to be depicted. Depending on the area of application and conditions, a large array of different lighting techniques can be employed.
The following techniques are recommended for photomacrography:
- Frontlight (0° - 20°)
- Side light (20° - 80°)
- Grazing light (80° - 100°)
- Grazing light (80° - 100°)
- Top light
- Black light
9. Lighting in microscopy
The following lighting techniques are relevant in microscopy:
- Transmitted light: The transmitted microscope light strikes the specimen from below, passes through it and is then collected on the other side by the lens. This technique is standard in microscopy.
- Incident light: With incident light – as opposed to transmitted light – the transmitted microscope light does not pass through the specimen but strikes it from above. This technique is used for thick layers and impermeable specimens.
Lighting methods to increase contrast:
- Bright field
- Dark field
- Polarisation contrast
- Differential interference contrast (DIC)
- Fluorescence contrast
- Phase contrast
10. Optimal lighting: LED lighting revolutionises microscopy

LED technology is the most advanced form of lighting technology. It is distinctive for its energy efficiency (12% on white), its narrow spectrum and its minimal space demands. Since LED lighting emits very little heat radiation (IR), it is the first choice as a light source for use in microscopes because it avoids unnecessary heating of living slide specimens (e.g. cell cultures). Even the camera sensor heats up considerably less than in conventional light sources (filament lamps, halogen lamps). This has the advantage of reducing image noise.
In the context of the many special processes in which cooled cameras are used, it is equally advantageous when only the truly necessary light elements strike the camera. A cold white colour temperature is advantageous for microscopy and produces vibrant colours.
Before the age of LEDs, microscopes were mainly equipped with halogen lamps. In comparison with normal filament lamps they create a better colour temperature and are more effective. With an effectiveness rating of 3%, however, halogen lamps compare much worse to LED lights (12% on white). The remaining energy (97%) is transformed into heat and must be released via the microscope stand.
11. Stabilised power supplies for lighting are mandatory
A stabilised power supply is strongly recommended for high-quality photographic documentation. Unfortunately, stabilised power supplies are only used on rare occasions. This is particularly noticeable in digital videos, where flickering or fringe patterns may occur as a result of inadequately stabilised power sources.
Such effects are caused by the interaction between the fluctuations in voltage of the AC current and the cyclical process of data collection from the camera sensor. In most cases, image quality is not affected by voltage fluctuations. The intelligent automatic exposure systems of modern digital cameras generally have no problem with this.
12. Macroscopy: Precise adjustment of the camera unit using a spirit level
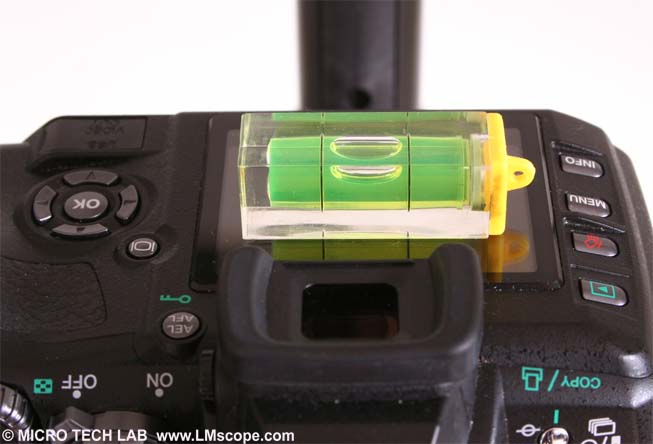
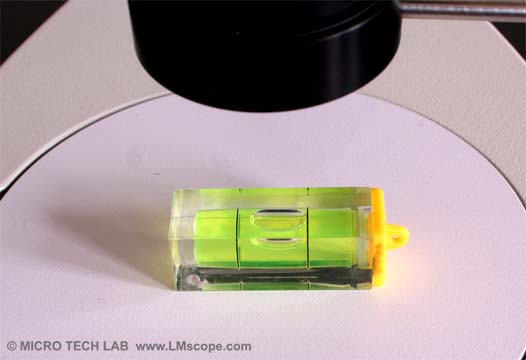
The base of the macroscope should form a right angle with the optical axis of the camera unit. Before starting to take images, a small spirit level should be used to compare both surfaces; otherwise an undesired gradient in sharpness may occur.
13. Using dyes to enhance image conrast
With colourless non-transparent specimen slides it is often very difficult to make the specimen details visible. The images appear pale and lacking in detail. Staining is a technique that can be used to enhance the image contrast and to make detailed structures visible.
14. Deactivation of the shutter release lock when using a camera with interchangeable lens mount on the microscope
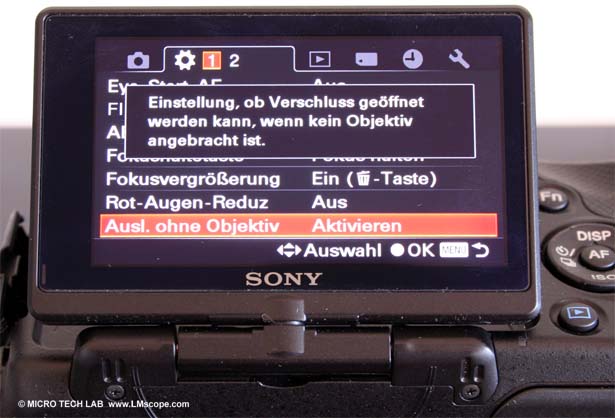
With some cameras, a shutter release lock is activated in the menu when a lens from a different manufacturer is attached. When working on the microscope, this lock must be deactivated.
15. Using a daylight filter and white balance
If needed, you can insert a daylight filter (light blue) into the illumination beam path or use your camera´s controls to adjust the white balance.
16. Setting parfocality: How do I simultaneously focus the image in the eyepiece and on the camera?
11.07.2011
New LM Digital Adapter for: Sony Alpha 9 III / Nikon Z9 / Nikon Z8 / Sony Alpha 7R V / Sony Alpha 1 II / Sony Alpha 1 / Sony Alpha 9 II (ILCE-9M2) / Sony FX3 Cinema Line / Sony Alpha 9 / Nikon D6 / Canon EOS R3 / Canon EOS R6 Mark II / Canon EOS R8 / Sony Alpha 7R IV / Canon EOS R5 II / Nikon Z6III / Canon EOS R5 / Sony Alpha 7S II / Sony Alpha 7S III / Sony Alpha 7R III / Canon EOS R6 / Nikon Z6 / Nikon Z6II / Sony Alpha 7R II / Nikon Z7 / Nikon Z7II / Canon EOS R / Canon EOS Ra (Astro) / Nikon Z5 / Sony Alpha 7C / Canon EOS RP / Sony Alpha 7S / Canon EOS R7 / Leica SL2-S / Canon EOS R10 / Nikon Z50 II / Canon EOS 1D X Mark III / Nikon Z50 / Nikon Z30 / Nikon Z fc / Nikon D850 / Canon EOS 1D X Mark II / Nikon D780 / Olympus OM-1 / Sony Alpha 7III / Olympus OM-D E-M1 Mark III / Canon EOS R100 / Sony Alpha 6700 / Nikon D5 / Sony Alpha 6600 / Fujifilm X-H2S / Fujifilm X-S10 / Fujifilm X-E4 / Fujifilm X-Pro3 / Olympus OM-D E-M1X / Sony Alpha 6400 / Sony Alpha 6100 / Sony ZV-E10 / Canon EOS 1D X / Nikon D4s / Olympus OM-D E-M5 III /